Design Details
The Altair 8800 is an ideal platform for reliving the birth and explosion of personal computing. Unfortunately, with
the Altair's status as a collector's item, the going price for the computer is now $2,500 or more. In addition,
keeping the vintage hardware running can be an on-going effort, often relegating the computer to a "keep your hands
off" status. So to get this great educational tool into the hands of hobbyists and students, I decided what the
world really needed was an affordable and reliable Altair 8800!
I set off to create an accurate replica of the Altair 8800. Unfortunately, it quickly became clear that in order
to meet price and reliability goals, the internal electronics of the replica would have to be different than the
original 8800. With this concession in place, the goal became creation of a replica – that with its cover in
place – duplicated the Altair 8800.
Case Design

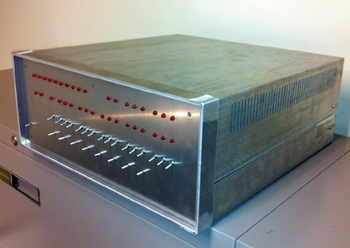
The Altair 8800's front panel and case are instantly recognizable, therefore, replication of the physical appearance
of the Altair was an important aspect of the design. Unfortunately, the cost of purchasing the Altair's Optima
case would have required doubling the target price established for the clone. In addition, it was going to be
very difficult to purchase the Optima case in a timely manner.
The choice was made to design a new enclosure from scratch in order to stay within price constraints
and to maintain control of delivery.
These pictures show the case prototype before paint and an inside view of a production version of the
replica case.

Electronics Design
Without the original hardware inside, the Altair 8800 Clone must emulate the Altair's electronics with modern
hardware. The full Altair configuration detailed on the home page is implemented in the Clone on a single circuit
board. The board centers around a Microchip PIC24FJ128 microcontroller connected to a few support chips and the array
of front panel switches and LEDs.

Hardware Emulation
Two levels of hardware emulation were required in order to accurately duplicate the Altair's operation. The first,
and most obvious, is an accurate emulation of the Intel 8080 processor. The second, is an accurate emulation of the
Altair's supporting hardware. It is this second level of emulation that makes the characteristics and quirks of the
Altair a natural fall-out of the emulation, rather than attempting to identify and simulate individual aspects of
the Altair's operation.
The 8080 CPU
The 8080 processor emulation was designed from the ground up to be as accurate as possible. The emulated CPU
duplicates the performance of the 2Mhz 8080 in the Altair 8800. Emulation is performed
at the memory cycle level. Every LED on the front panel is updated with each memory cycle. Instruction timing was a
natural fall out of the memory cycle emulation. The result is a very accurate replication of Altair program
execution and front panel activity. The processor emulation includes interrupt detect and acknowledge cycles –
even supporting these cycles during the HALT state.
The 8080 CPU emulation in the Altair Clone passes a tough set of CPU tests that
several popular emulators on the internet cannot pass in their enitirety.
Supporting Hardware
Emulation of the supporting hardware – especially the front panel hardware – adds to the accuracy of the
emulation. The real front panel, for example, implements memory examine and deposit functions by jamming
instructions into the 8080 processor. This results in a few unexpected artifacts if an examine or deposit
operation is done when the processor is not stopped at an M1 (instruction fetch) cycle. Because the Altair Clone
emulates the front panel hardware instead of directly performing memory examine and deposit functions, these
same artifacts appear when operating the Clone.
Memory
The Altair Clone provides 64K of zero wait-state RAM. The Altair's memory protect feature is implemented
in 256 byte pages.
Eight PROM slots are provided. Each slot is up to 2K in length. The PROM slots replace RAM in 256 byte increments.
PROM content is non-volatile and is immediately available upon power on. PROM content is initially loaded via
the serial port from a .hex or .bin file on a PC using the Clone's Configuration Monitor.
When the 8800bt Turnkey board is enabled, an
IN from port 255 (the sense switch port) disables PROM and enables the overlaid RAM. This provides access
to a full 64K of RAM. The PROM is re-enabled whenever the computer is reset from the front panel or at power on.
This duplicates operation of the original Altair Turnkey hardware.

Serial I/O
The Altair Clone provides two RS-232 serial ports on DB-25 connectors mounted in the rear panel of the computer.
The optional
Audio Cassette Interface adds a third serial port to the rear of the computer. These
ports be configured to look like numerous combinations of ports from the 88-SIO and 88-2SIO boards.
The interrupt capability of both boards is fully implemented. The Clone also implements the 88-2SIO's RTS and CTS
handshake lines on the first two serial ports. The DCD signal is not implemented on the rear connectors.
Cassette I/O
The original 88-ACR Cassette Interface utilized an 88-SIO board for I/O with the processor. By configuring one of the
two serial ports to be the SIO board of the cassette interface (I/O addresses 6 and 7), any software which utilized
the cassette interface (e.g., loading BASIC, saving and loading programs, etc.), can function as expected by
exchanging cassette data at RS-232 levels with a PC.
For a more realistic Altair experience, add the optional Audio Cassette Interface
which adds a third serial port to the Altair Clone and provides connections for the microphone input and headphone output
of a standard audio cassette recorder. The cassette interface uses the same modulation (2400Hz/1850Hz) as the
original 88-ACR so that tapes are interchangeable between the Altair Clone and the original 88-ACR.
Printer I/O
Data written to the 88-LPC (Okidata) or 88-C700 (Centronics) printer interface boards (e.g., LPRINT and LLIST from
BASIC) can be routed to one of the Altair Clone's serial ports. This allows printer output to be captured on a terminal
emulator or routed directly to a serial printer.
Floppy Drives

The Altair Clone implements the Altair 88-DCDD Floppy Drive System using non-volatile RAM on the internal circuit
board. Three 88-DISK floppy drives are emulated (330K, 77 tracks, 32 sectors per track, 137 bytes per sector).
The Altair floppy's data transfer rate, sector index rate, track stepping rate, controller registers, etc., are all
accurately duplicated. For example, if the sector position register is examined by single-stepping a few instructions
via the front panel, the sector number can be seen updating in real-time on the front panel data LEDs.
Boot ROMs, Disk BASIC, Altair DOS, CP/M, etc., all operate as if connected to original Altair floppy drives.
A connection to a PC is required only to "insert" a new floppy disk. Other than that, a PC connection is not
required.
Since the emulated drives are non-volatile, floppy disk content will be present any time the Altair Clone is powered
on without having to re-connect to a PC. The three floppies can be swapped between drives without requiring a PC
connection. Generally, this is done to put a different floppy into drive zero for booting.
The Configuration Monitor on the Clone is used to "insert" a new floppy disk by transferring a disk image
from a PC to the Clone via a serial port. Transfer time is about 40 seconds. A disk image can also be transferred
from the Clone to a PC for backup.
Disk images used on the Altair Clone are byte-for-byte copies of original Altair floppy disks – the Clone
does not require a customized floppy image. Utilities
are available to image a real Altair floppy to a file on a PC and vice-versa. This means that if you have access
to an original Altair with a floppy drive, you can put any floppy from the Altair onto the Clone, and
conversely, write disk content from the Clone to a real Altair floppy!
The 5.25 inch Altair Minidisk floppy drive and
controller are also emulated in addition to the original 8 inch Altair floppy drive. The Minidisk has an unformatted
capacity of 75K (35 tracks, 16 sectors per track, 137 bytes per sector).
Interrupts
Interrupts in the Altair 8800 Clone can be generated by both serial ports (2SIO and/or SIO for both transmit
and receive), the floppy disk controller ("sector true" interrupt at the start of each sector), by the real-time
clock (present on the emulated 88-VI/RTC vectored interrupt and real-time clock board), and by the 88-C700
Centronics printer interface.
The 88-VI/RTC prioritizes interrupts to the 8080 processor from the vectored interrupt lines
(VI0 - VI7) on the Altair bus. The board also provides real-time clock interrupts if required. While not
widely used for most commercial software, the VI/RTC board is required by MITS Time-Sharing BASIC for the Altair.
If the 88-VI/RTC board is not enabled, then the default interrupt structure of the Altair (PINT with RST7) is used.
In this case, all devices can be tied into the PINT line at the same time as the emulated devices all drive the
PINT line with open collector outputs. As with the original hardware, all boards (other than the 88-VI/RTC)
ignore the 8080 interrupt acknowledge cycle, so the 8080 processor sees a RST7 instruction on the bus (all data
bits high) during the interrupt acknowledge cycle.
Miscellaneous

Power Supply
The Altair 8800 Clone is powered by a 15 watt, 12 volt power supply. The computer is shipped ready for
100-240 volt operation with a US style plug. Operation from an international power main requires only
a plug adapter as the power supply automatically adjusts for 100-240 vac power.
A chassis fan is provided solely for effect.
Without the fan connected, current consumption averages about 40ma. If desired, the Clone
can be configured to run from a set of 4-AA alkaline batteries for over 50 hours!
Cheats
While the primary goal of the Altair 8800 Clone is to duplicate the Altair 8800 experience (including its limitations),
a few "cheats" are accessible through the Clone's configuration monitor:
- Load a .bin or .hex file from a PC directly into memory.
- Disable simulation of track stepping and sector rotation delays for the floppy drive. This significantly improves floppy performance.
- Add 8800b style functionality to the down position of the single-step button: Single step or auto-step from 1 to 8 times per second.